
One Room Challenge: THE Reveal
It’s been a few extra days, but, THE day has finally come, you guys! My master bedroom and bathroom are finally complete (ish)! No, really, only a few minor details will be worked on over time, but the spaces are done!
Before we jump into all of the gorgeous photos, I just wanted to take a moment to show my gratitude to a few people. First, thank you to Linda, creator and coordinator of One Room Challenge. This event is quite the production, but she is right there for each designer to lean on every step of the way. Next, a huge thanks to my best friend and design wife, Shavonda Gardner. Although I had been designing these spaces in my head long before the opportunity to participate in ORC, she was there to be by checks and balances for every selection, keep me focused on the overall design and tackle a ton of the behind the scenes responsibilities that come with being an ORC featured designer. Not to mention, if it weren’t for her, my participation in One Room Challenge wouldn’t even be possible. She not only opened a door with her participation last fall, she held it open and walked me through it this time around. I’m beyond grateful to her for that! Lastly, thank you to all of you guys. In all of my years of being a part of social media and the internet, I have never recieved so much support from my community and those that follow the ORC season. I’ve cried from all of the “we’re here no matter what or when” messages from all of you and you’ve been the battery in my back that’s kept me pressing forward. From friends that have seen me in person to friends that only know me online, thank you so much for all of the love and support! I’m eternally grateful to each and every one of you!
Before we get to the all the amazingness that exists now, we have to go back to where things started. (And if you’ve missed out on the entire process, go back to weeks one, two, three, four, five and six) Here’s what the bedroom and bathroom looked like before.


We couldn’t move any walls, but we did our best to make design decisions that would totally transform the spaces aesthetically and increase function and value in every way possible. I wanted spaces that not only looked better, but also felt better. And considering the structural confines and constraints that we had to work within, we totally created some magic.
Now, let’s get on to why everyone is here! It’s time for the reaveal!
MASTER BEDROOM
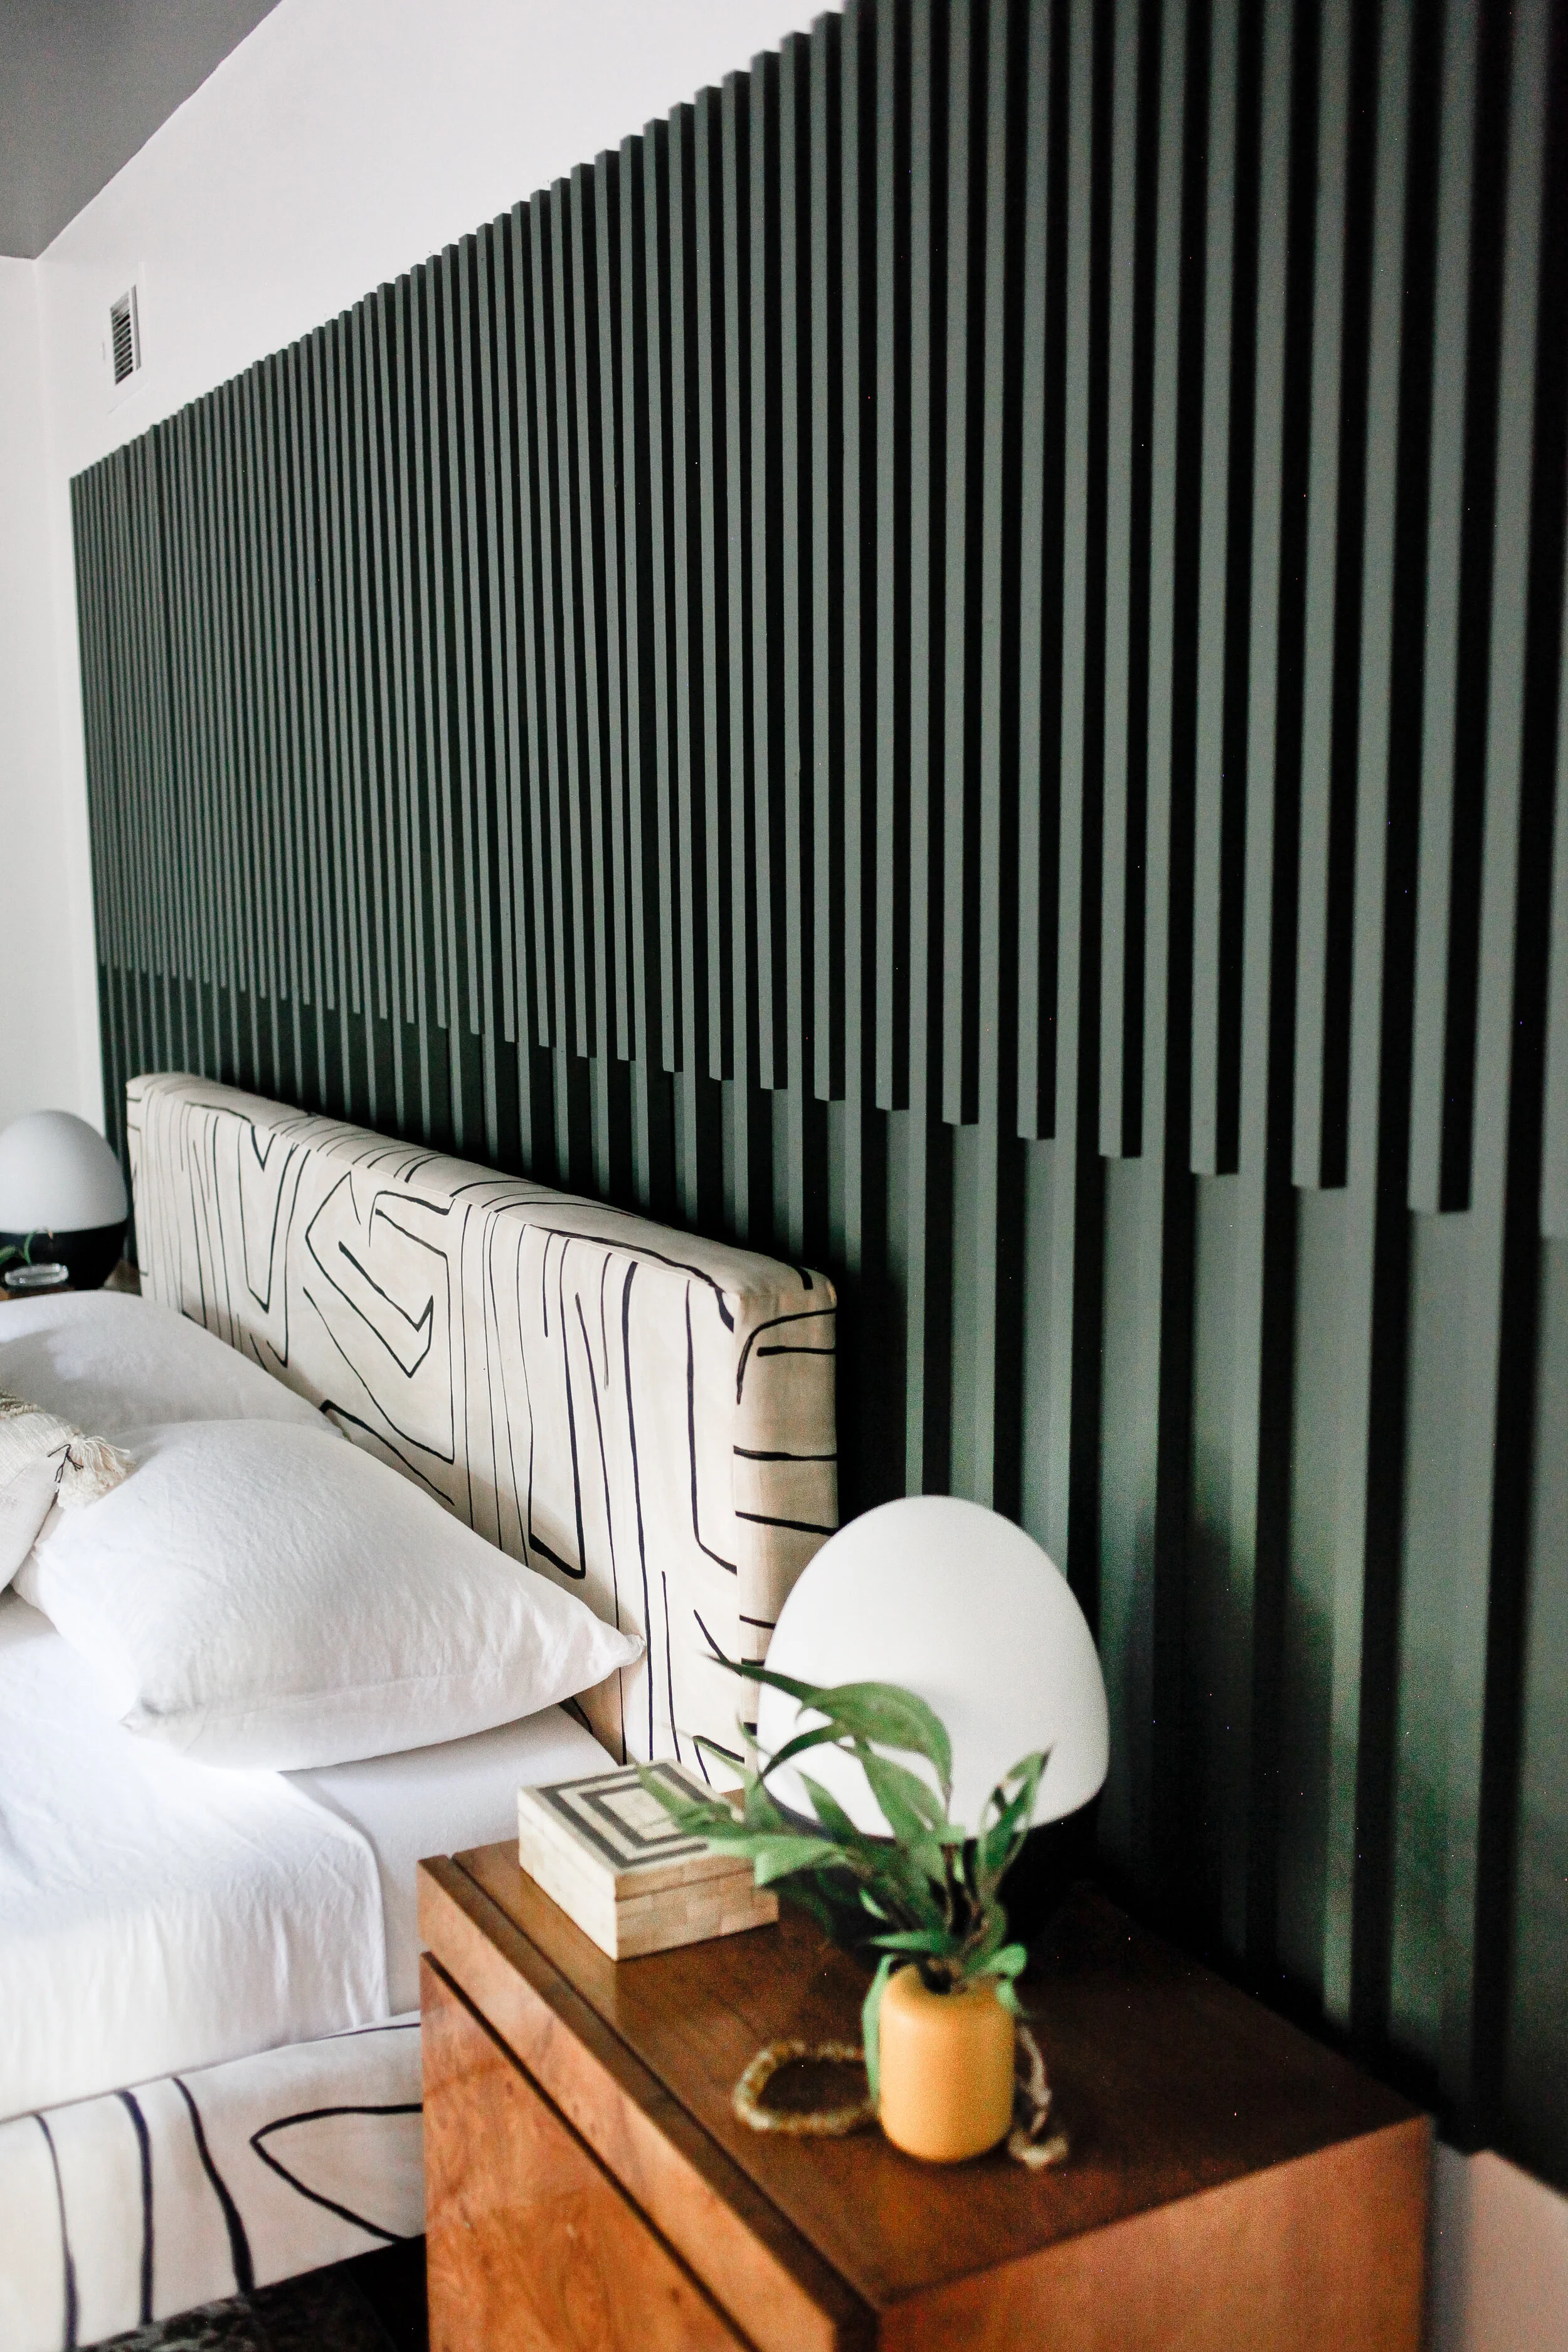
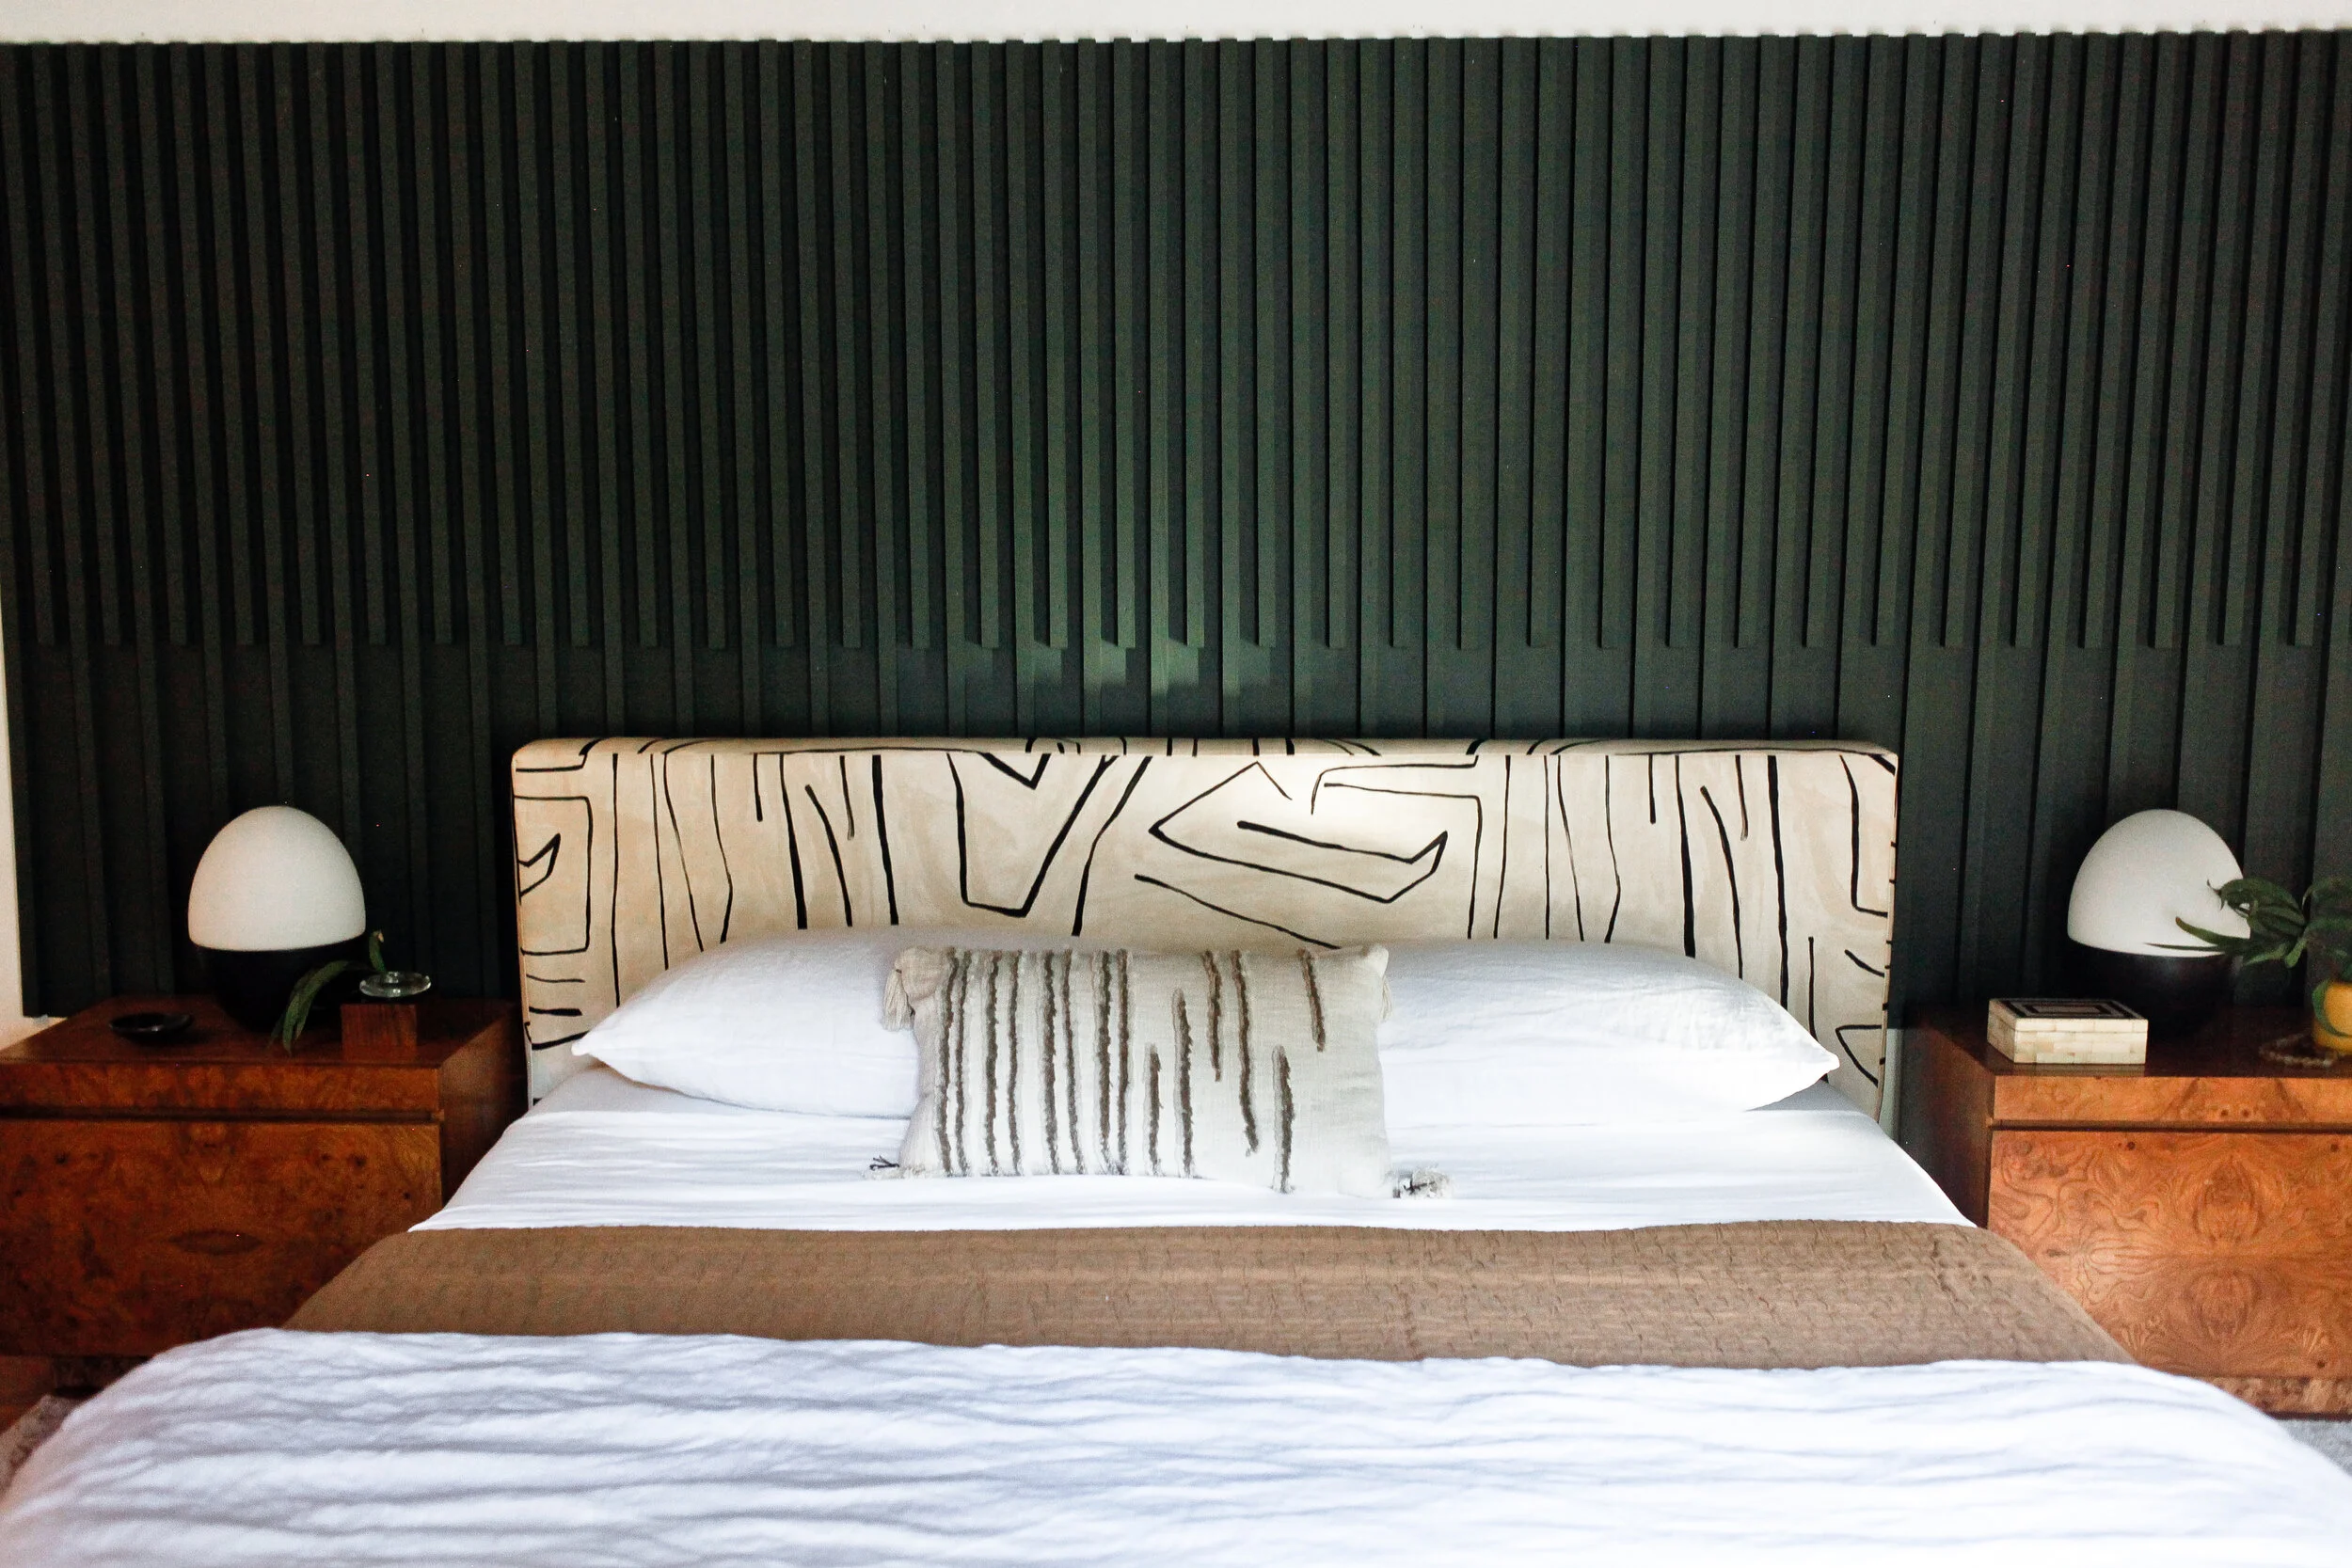
Changing the source of natural light in this room was the single most import change we could’ve made. It was the catalyst for the rest of the greatness that happened in this space. What was almost simply a new window, Shavonda suggested something so much better. In the end, we have the master bedroom that this home should’ve always had. We shocked the world by going white on the walls (Behr Marquee Interior Satin Ultra Pure White), but would never go for that “white box” effect. To bring back the moodiness, we had the popcorn ceiling scrapped and painted in Behr Marquee Interior Matte North Woods.

FRENCH DOORS
The very first thing we did was tackle our natural light issue by removing the ill-placed window and installing brand new French doors in the center of the room. These JELD-WEN doors came straight off the shelf at Lowe’s and were just perfect for what we needed. Painted black and finished off with these Modern Keyed Lockset hardware from Emtek, you’d think they were custom! I framed them out with these French Green drapes from Amazon. I took a chance and ordered them site unseen and the color and quality were perfect, especially at that price! I think I may order another pair to make them a bit fuller though.


ACCENT WALL
With the new French doors initiating a new layout, I wanted to up the architectural features in a room that previously had none. I’d seen this wood slat feature several time on Pinterest and thought it would be a great addition to the bedroom. But, instead of a typical wainscotting, I wanted the feature to feel more like art. To get that effect, we pulled the design away from walls and floor (18” from the floor and ceiling and 14” from the corner and frame of the door), creating a 12’ wide and 5’ tall rectangle. I new I wanted to use 1” x 1” moulding to achieve the look and the 238 pine square moulding from Empire Moulding & Millwork was perfect. To get the look I was going for, I needed over 350 linear feet of it! I had my carpenter cut down each of the 8’ lengths into 5’ and 3’ pieces. I painted each of the 3 facing sides of the moulding in Behr North Woods and left the side that would be attached to the wall bare. I taped off my 12’ x 5’ rectangle and painted the inside the same color (Behr North Woods) for a tone on tone, textural effect. We started with the end closest to the door and put up our first 5’ piece with a little glue and a few shots from the brad nailer). We used a scrap piece of 1” x 1” moulding as a spacer, then installed a 3’ piece. We just repeated the process until we got to the end of the rectangle. A little time cosuming (but still less than a day’s work with 2 people), but overall….sooooooooo worth it!

BED & BEDDING
If you know anything about me, then you know that Kelly Wearstler is one of my favorite designers. You’d also know that her Graffito fabric is my all-time favorite pattern in design! It was the inspiration behind the design I hand-painted in our entrway, so when the opportunity came to have it the “real” thing in the form of a bed, there was no question on whether or not it would be mine! The foundation of the room and very first thing I picked out for the space was the Deva Linen Platform Bed in Linen Graffito from one of my favorite retailers and brands to work with, Lulu and Georgia! This bed is the literal manifestation of my dreams! The Graffito pattern on the clean lines of the bed are an ideal combination and the clean metal legs finish it perfectly. So, when it came time to dress it, I knew I wanted to keeps the bedding pretty simple. In keeping with the linen, I chose to go with the white Solid Relaxed Linen line from Garnett Hill for my sheets, pillow covers and duvet. For a touch of color, I added the Rippled Organic Cotton Coverlet in Camel. To finish it off, I added this textured stripe pillow from Loloi. Overall, the look is simple and natural, but it feels so soft and sleeps like a dream!


RUG
With the bed being the star of the show, she needed the perfect stage. Something that wouldn’t compete with her graphic lines, while also being soft underfoot. Nothing could’ve been more perfect than the Patina rug from Loloi in the Champagne/Light Grey colorway. The pattern is subtle but has so much movement and the cool tones pick up on all of the olive green in the space! The poly blend makes it not only super soft under foot, but also, easy to clean!


SEATING
With the room was growing with all of it’s straight lines and angles, so I wanted to bring in some seating with a rounded shape to add some much need softness. The Tina chair from Jonathan Louis fit the bill perfectly. The soft olive leather and champagne brass finish on the bass add a feeling luxury that you always hope for in a space. If you’re looking to get your own, just click here for the closet location to you!


ART & DÉCOR
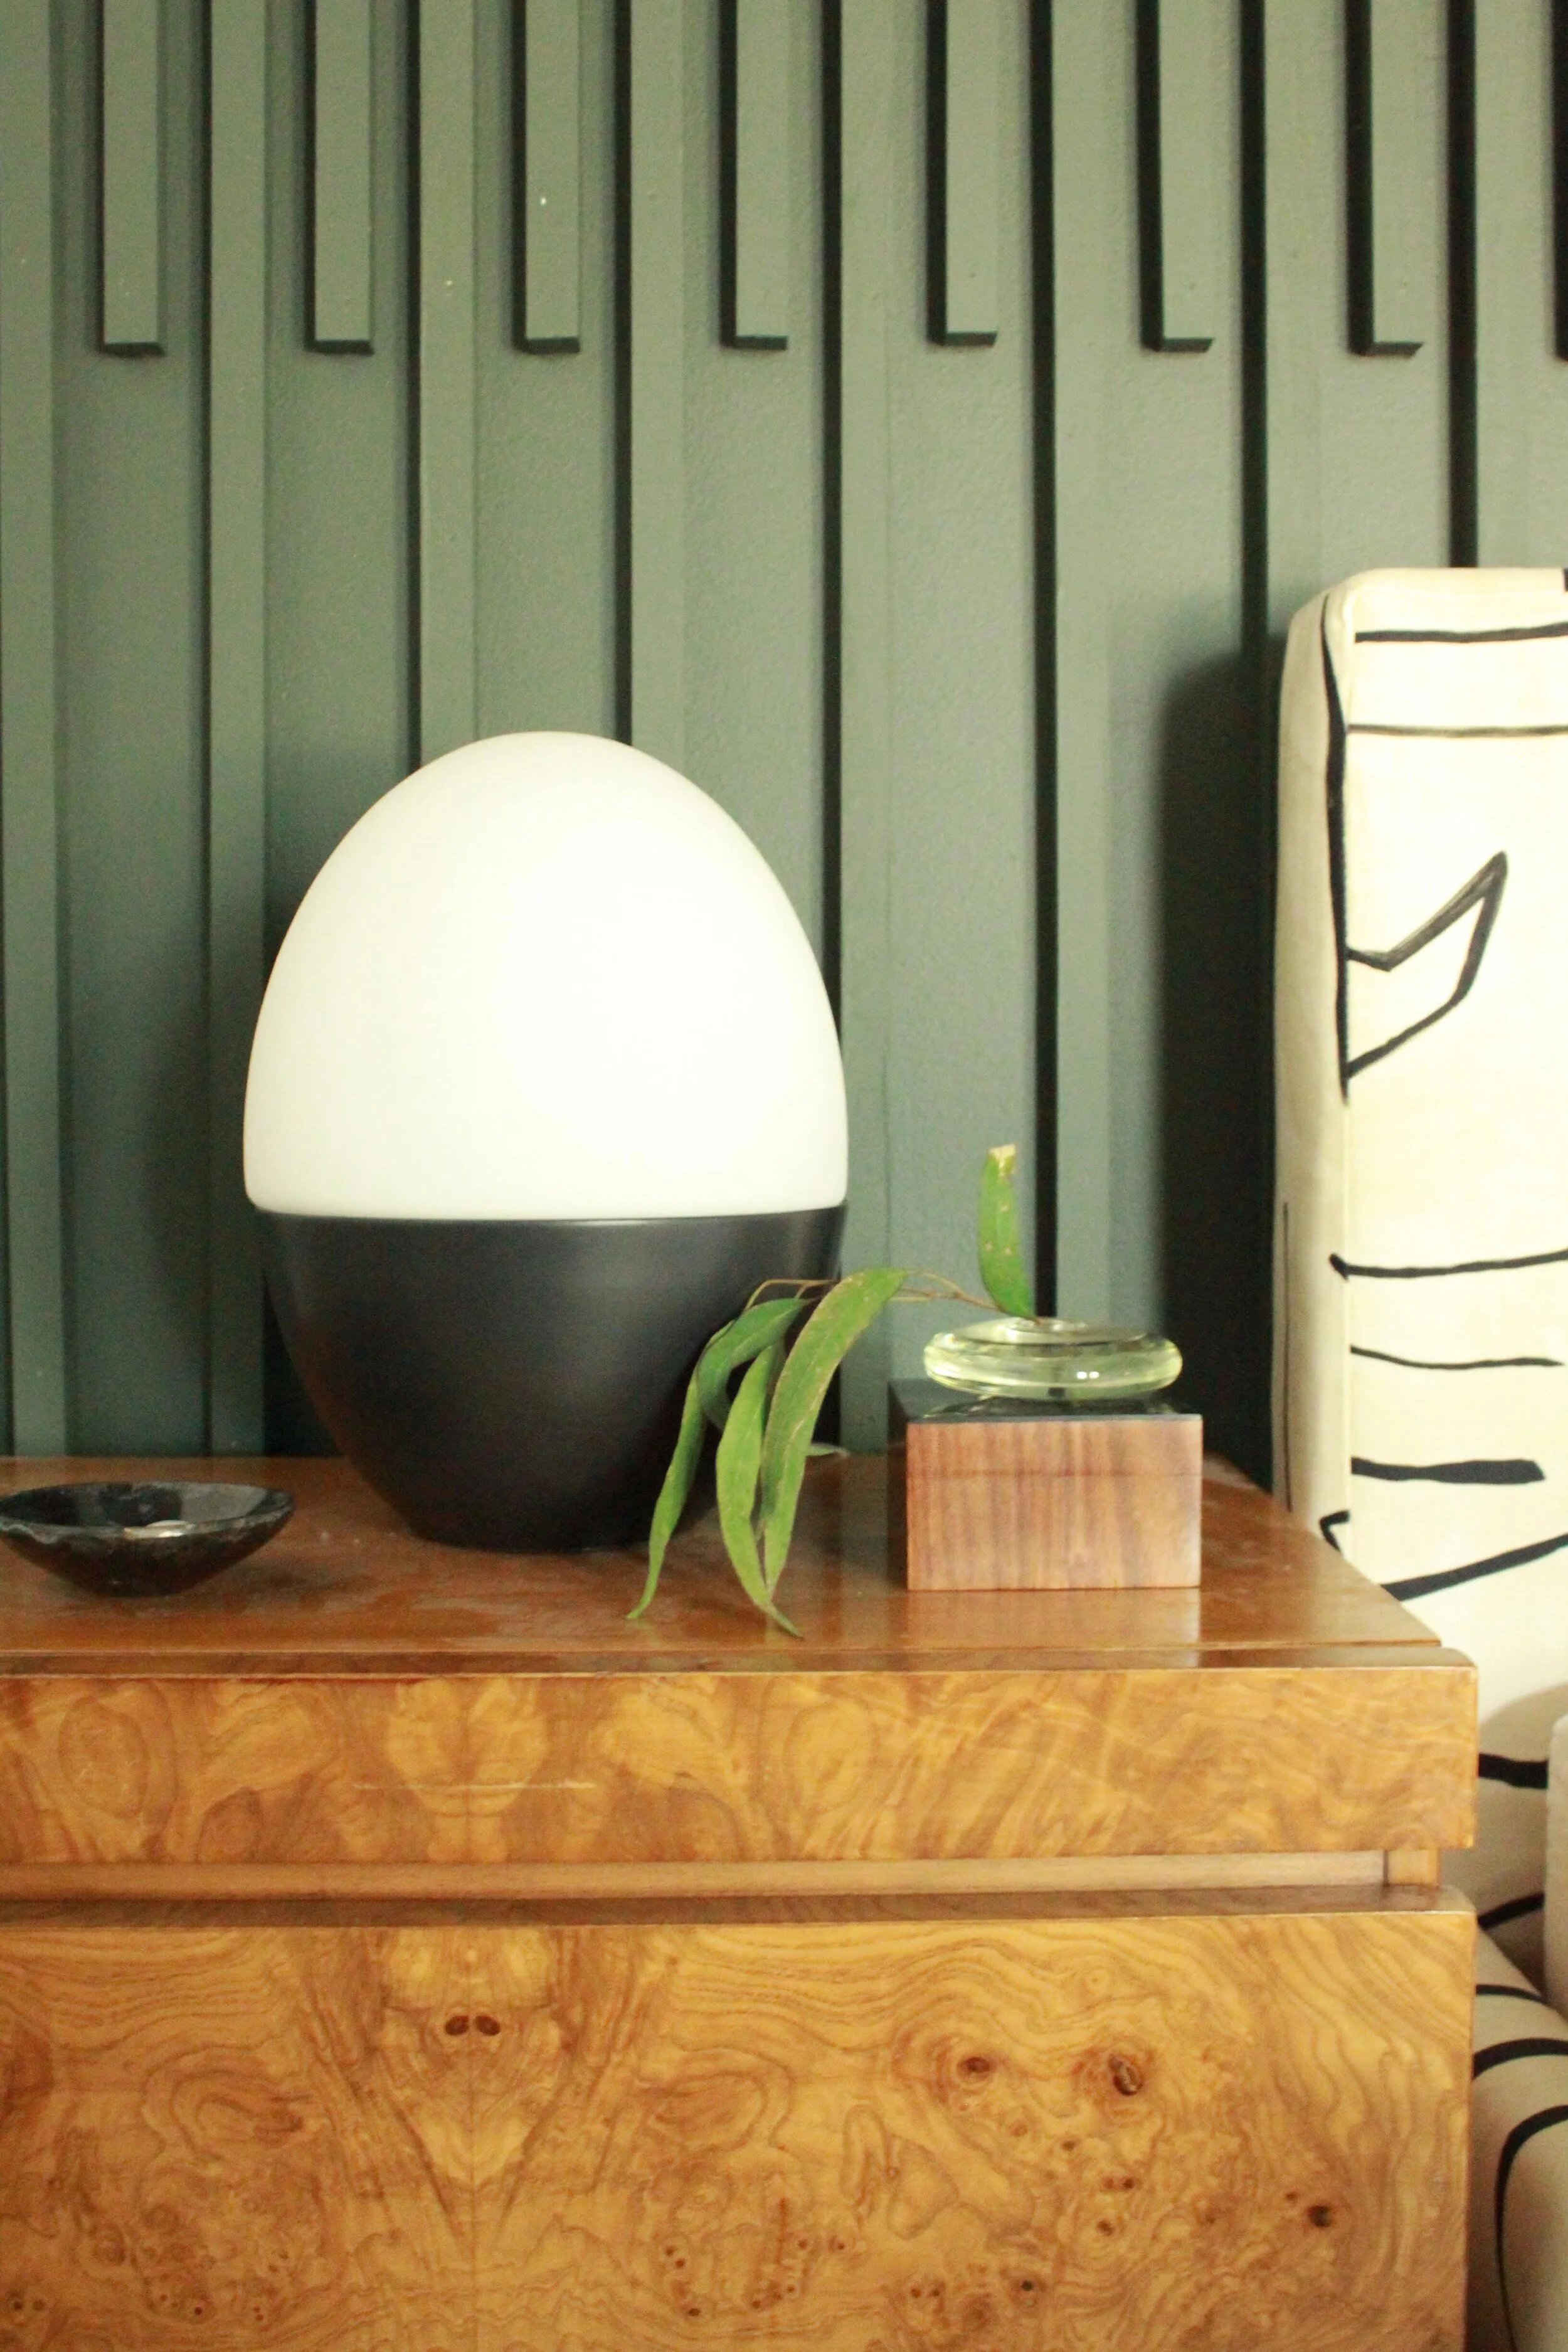
I wanted art that was abstract and simple, yet bold when placed against the white walls. I picked out Off the Grid 03 by Jennifer Morehead in a matte brass frame, Zickafoose by Misty Hughes in a matte black frame and Point of View by R Studio in a rick black wood frame. I wanted to bring in some of my older art that I created a couple years ago to give the the room a familiar feel and they compliment each other so well. Meg from Tierra Del Lagarto sent me these gorgeous Amber colored and black beads. These decor items are the crowning pieces of the room. They create the little moments that make me smile.


LIGHTING
In addition to the gorgeous natural light that now flows into the room, we added lots of ambient and accent lighting to the the space as well. We replaced our previous ceiling fan with a new, larger, sleeker one from Kichler Lighting. I love that the 3 blades feel more modern and the flush base makes it feel much more substantial than one with a down rod. We with with a black finish so that it disappears in the dark ceiling. We now have zero problems with dark corners, thanks to the brand new recessed lighting we added to each corner of the room. We reached for the empitomy of decorative lighting goals by bringing in the Multi-Focal Wall Light from Blueprint Lighting and these Orian table lamps in an old bronze finish from MItzi, a brand from the Hudson Valley Lighting group. Their round, organic shapes add to the balance in the space that I mentioned previously when chatting about the rounded back chair.


FINISHING TOUCHES
The finishing touches of any space are the crowning details that people remember. Mine are simple objects that make my heart smile every time I see them. These beautiful beads from Tierra Del Lagarto are like flowers; they have no purpose execept to be beautiful, but totally make a space feel finished. And you know I wasn’t going to redesign my bedroom and not design it to have my plant babies included. I had the opportunity to work with Lulu & Georgia on their new roll out of live indoor plants and these came in perfectly and in perfect condition. I love that their white stone pots feel simple and modern, but add so much texture.


SHOE CLOSET (SNEAK PEAK)
My shoe closet is about 50% complete. I just have to finish painting the shelves. I’ve been in no rush though, because 90 percent of my shoes are covered in construction dust. It’s going to take me the rest of the year to get them all clean! But on the bright side, they’ll have a pretty place to land once they are clean.

MASTER BATHROOM
Since moving walls wasn’t an option, we had to think of the best way to utilize the space we had. One flaw in our bathroom before was two swinging doors that kept us from moving freely throughout the space. They also took up some valuable floor space that I was dying to get back. Opting to have pocket doors installed gave me back my floor space and upped the functionality factor times 10! With the help of their new narrow oval pocket door hardware from Emtek, the up the beauty factor too! The brass finish and modern shape totally elevate these builder basic doors.
Funny enough, I had most of my selections for the bathroom made before we even started on the bedroom. I knew from the beginning that I wanted a moody, boutique feeling bathroom. Don’t get me wrong, I love a bright, clean, spa-like bathroom just like the next person, but my gut, along with my anti-bright space hubs, I knew that wasn’t going to be the look for us. Again, we couldn’t move any walls to make the space bigger, but we made a lot of smart decision to amp up the function and style of the space.


SUN TUNNEL
Just like the bedroom, we tackled the issue of natural lighting from the beginning! Shavonda has an incredible Velux Sky Light installed in her bathroom, so they were my go-to for helping me determine what would be best for our bathroom. I reeeeaaaallly wanted and had my heart set on a sky light, but our roof line just wouldn’t allow it. To get one installed, we’d basically have to rebuild our entire roof! Fortunately, the amazing team at Velux came to my rescue with helping me figure out an alternative solution that would still make my natural light dreams come true. Enter the VELUX Sun Tunnel Skylight! Unlike traditional windows, the VELUX Sun Tunnel® Skylight can be installed within an afternoon, making it one of the fastest and most inexpensive ways to transform your home with natural light! Velux’s 10” Rigid Sun Tunnel option was perfect for our bathroom and we were even able to upgrade it with the Solar Nigh Light accessory. I’m in loooove with this thing!!! We can totally use our bathroom all day and night without having to turn our lights on! And if we do, the natural light element is perfect for things like doing my makeup or when hubs has to put in his contacts! Not to mention, we sacrifice zero privacy to get it! No more fears of nosy neighbors! So many of you had your minds blown when it was being installed, so if you’re interested in getting your own, click here to find the best VELUX certified installer near you! If you’re in the Memphis area, just call Mid-South Skylights


THE TILE SHOP TILE
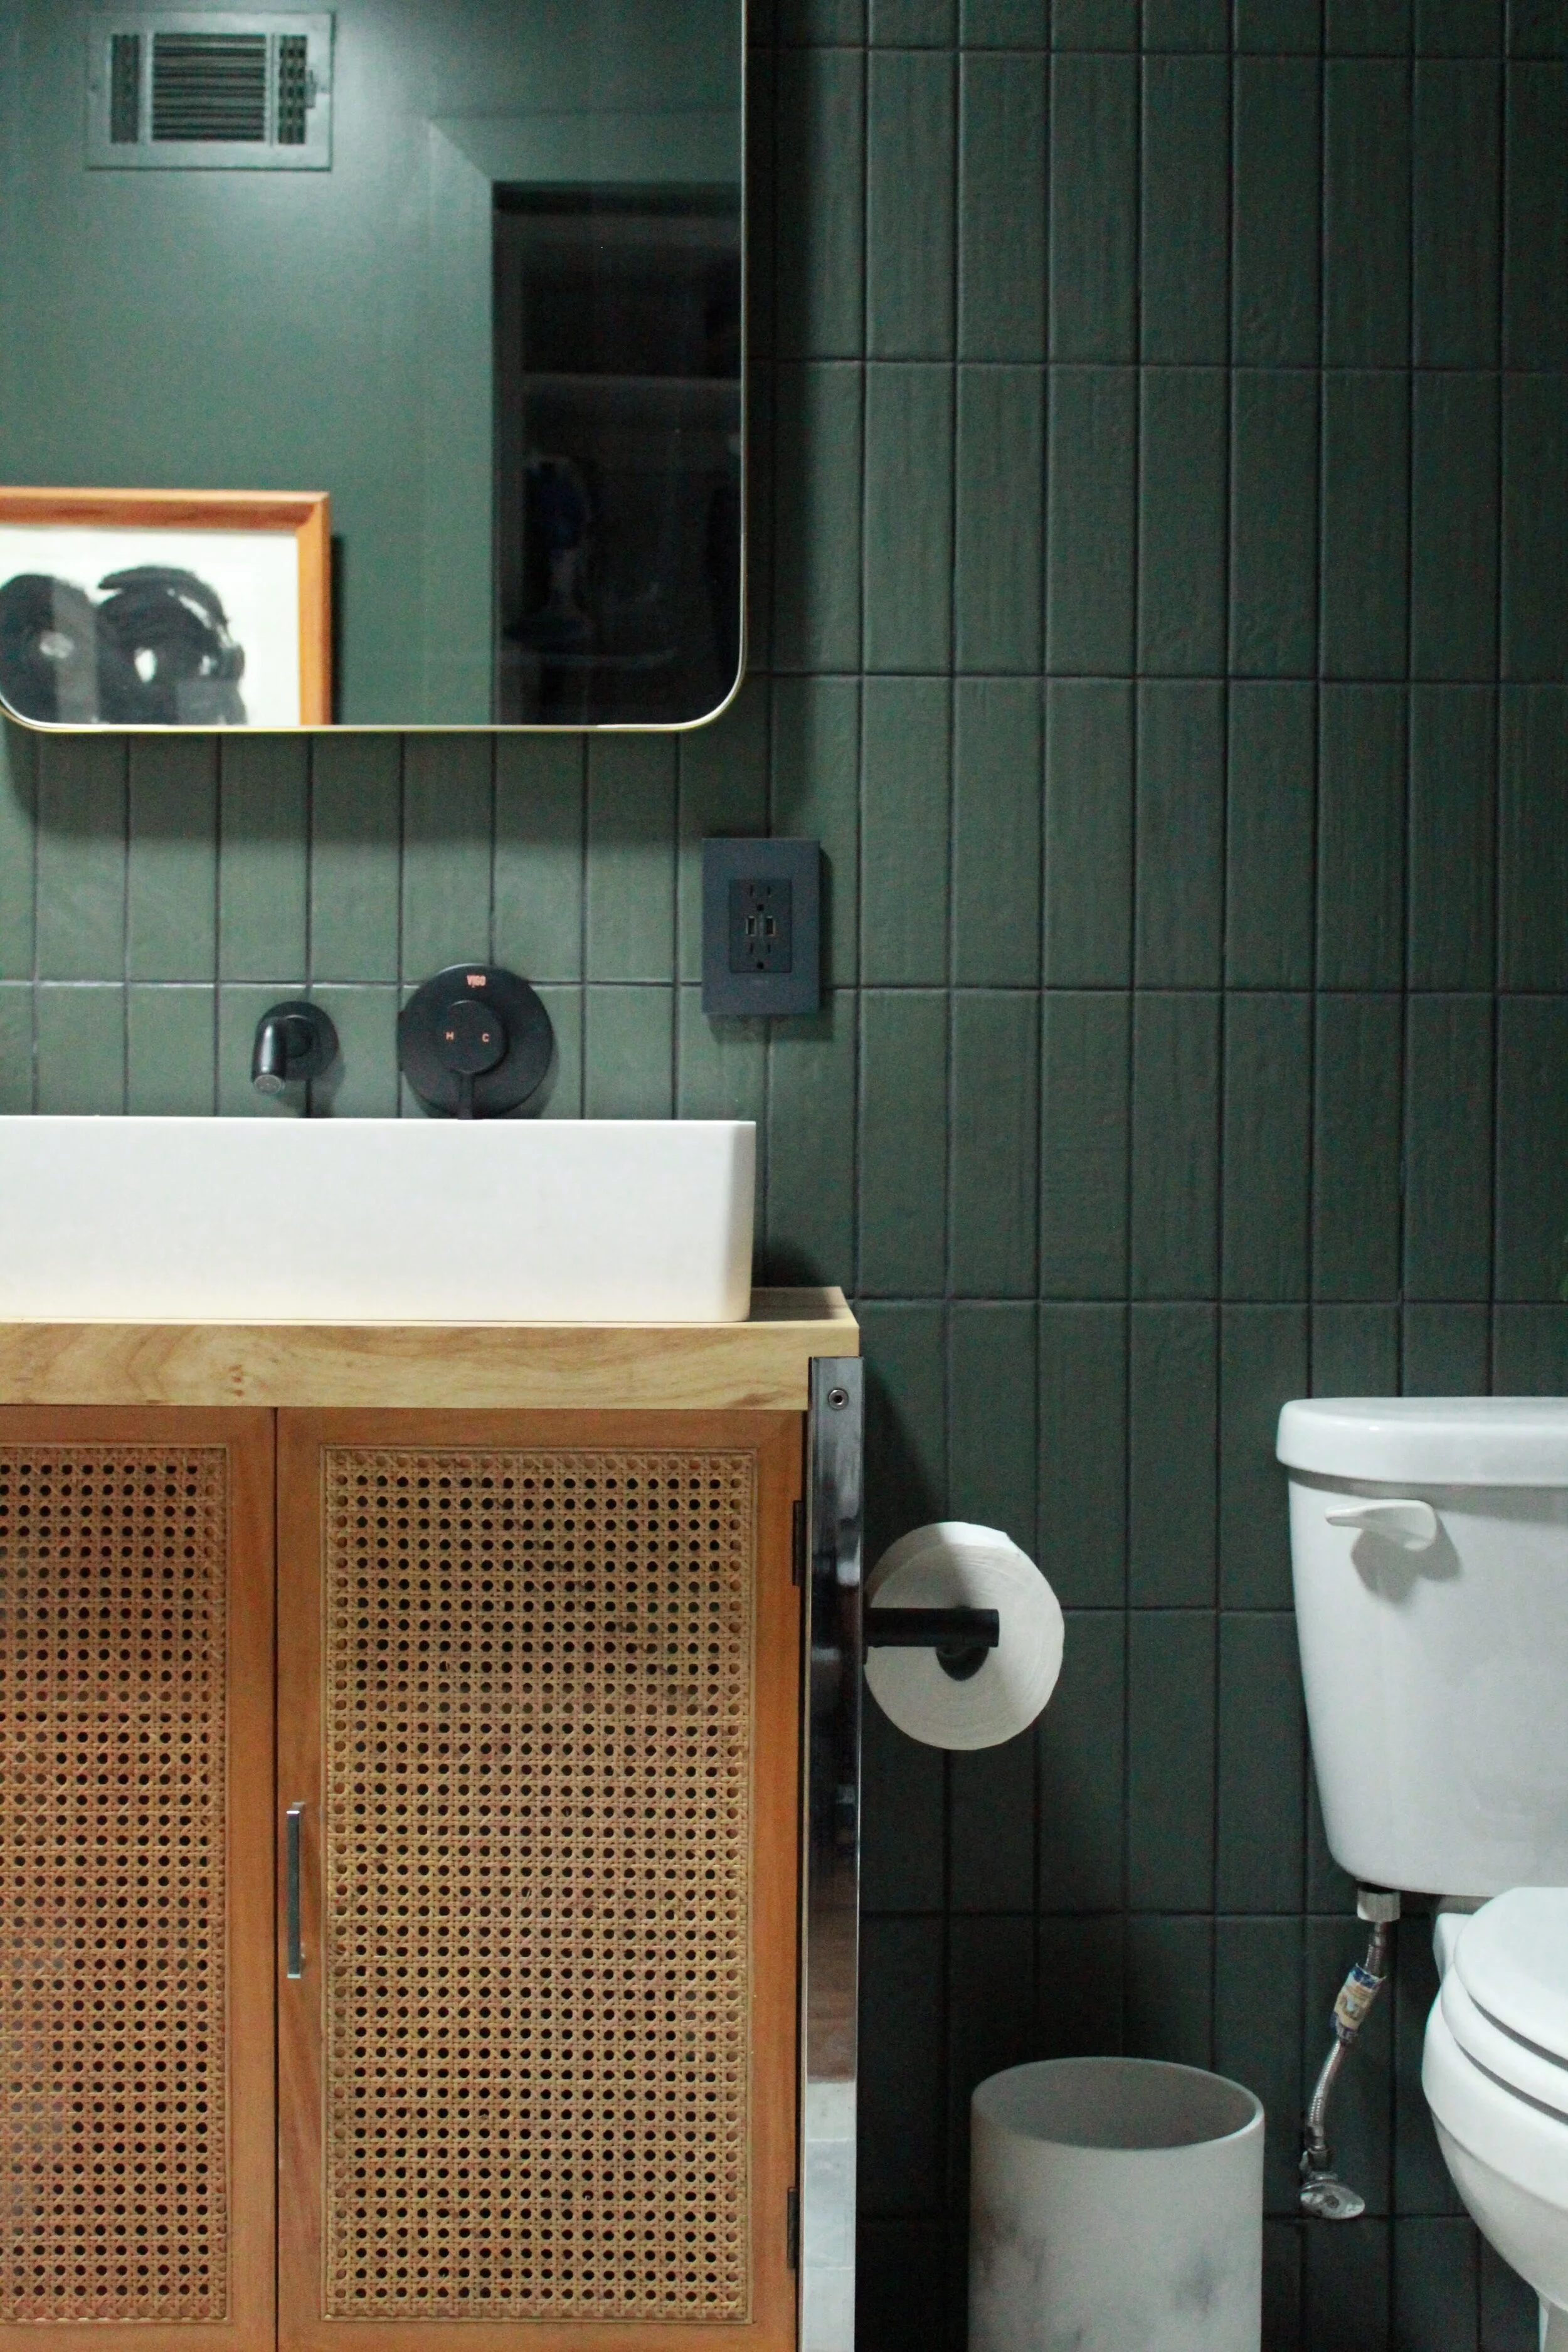
Thanks to our new Sun Tunnel, I totally went for the moodiness with this Color Market Army Ceramic Subway tile from The Tile Shop. I was so in love with the color that I wanted to wrap the entire room in it! Honestly, I almost did, but figured 3/4 of the room was enough! LOL! We had it installed floor to ceiling in the shower and along the entire vanity wall. The texture gives the tile a hand-made feel; another added touch of luxury. On the walls that didn’t get tile, we painted it Behr Marquee Interior Satin North Woods, which couldn’t have been a more perfect match. I can’t wait until the frame-less glass shower door is installed! Praying that it happens in the next week or so!
Since all the walls were going green, I wanted the floor and ceiling to be white to bring in some lightness and add balance. The bathroom floor is Maldive Carrara Polished 12 x 24 tiles from The Tile Shop. I couldn’t find it on their site in the 12 x 24, but here is is in the 4 x 12. The white background was perfect, but I loved that it had some warm variations that would pick up the finish of the vintage vanity that I found back in June. It also had some cooler grey tones that felt like water and complimented the green tile perfectly. For the shower floor, we wanted to continue the white color, but with something with a more natural feel, so opted for these White Medium Pebbles mosaic from The Tile Shop. Everything on the floor was set with white grout and all of the wall tile was set with black grout. I love the contrast, but my installers hated me once they were done.


LIGHTING
To contrast against the moody green tile, I chose these Focal Point Wall Sconces in bright white from Blueprint Lighting. I loved their sleek and simple round shape against the dark textured tile. My favorite thing about about them is the hint of brass as their base.


VANITY
The vanity was a lucky, local vintage find. I saw in my friend Kristen’s stories one day and immediately asked her where she was so I could sprint over to snag it!


NICHES & MIRRORS
I was dead set on medicine cabinets for bathrooms to help with all of the on-top-of-the-counter-clutter problems that we were having before. When the medicine cabinets were no longer an option, I had the contractors build out niches in between the studs above where the vanity would be. I bought these mirrors for a great deal on Amazon and put them on these hinges in black, secure them with magnets and now we have our own version of medicine cabinets!

SINKS, FAUCETS & SHOWER FIXTURES
Not sponsored,but I know you guys will ask…here are the links to our sinks and faucets and our shower fixtures.


OUTLETS, SWITCHES & HARDWARE
We had our electrician upgrade all of our outlets and switches to everything from the Adorne collection from Legrand. Who knew outlets and switches could be so sexy!? It’s details like these that can totally elevate a space. We had two new outlets installed above the vanity (his and her) and a new location and bank of switches to accommodate our new pocket doors. Our toilet paper holder from Bathroom Butler is simple and modern. The matte black finish matches perfectly to our faucets.


FINISHING TOUCHES
I’m a white sheets and white towel kinda girl. I need to bleach all the things when it comes to cleaning and sleeping. I love these Signature Egyptian Cotton Towels from Garnett Hill. I got the body towels and the face cloths. To really give this box a sense of someone living in and using it, I brought in a little teak stool from Homegoods and a simple black soap pump from Target. The art is another piece that I created a couple years back and placed in a thrift store frame.


So that’s it friends! We made it! Finally! Was it worth the trouble…HELL YES!!! Would I do the One Room Challenge again….IN A HEARTBEAT! Just as long as it’s not a bathroom!


Thank you again to all of my amazing sponsors. I hope that I’ve done them proud.
The Tile Shop | Lulu & Georgia | Behr Paint | HANDy Paint Pail | Lowe’s | Blueprint Lighting | Emtek Products | Loloi Rugs | Jonathan Louis | Minted | Hudson Valley Lighting | Kichler Lighting | Empire Molding & Millwork | Legrand | Garnett Hill | Tierra Del Lagarto | Bathroom Butler
Thank you again to Linda for giving me this opporturnity, Shavonda for helping me along the way and to all of you for cheering me through this entire process! I love you all!
HUGE THANK YOU TO KIM THOMAS FOR SHOOTING MY SPACE AND GETTING ME IMAGES LESS THAN 24 HOURS LATER! I LOVE YOU FRIEND!
Just in case you haven’t seen all of the amazingness created by the other featured designers, please be sure to check them all out here!
At Charlotte’s House | Design Addict Mom | Erika Ward Interiors | Erin Kestenbaum | Girl & Grey
Gray Malin | Hommeboys | I Spy DIY | Jewel Marlowe | The Learner Observer | Making it Lovely
Nicole White Designs | Old Brand New | Oscar Bravo Home | Place of My Taste | The Rath Project
Room for Tuesday | SG Style | Undecorated Home | Veronica Solomon | Media BH&G | TM by ORC